Friday, November 30, 2012

Soupy Sundays- Broccoli and Beef Soup

It's been a while soup lovers. So here I present to you an easy Soupy Sunday recipe using your crockpot. People, let the appliance do your cooking!!!


Crock Pot Beef Broccoli Soup
Ingredients:
                1 1/2 lbs lean ground beef
                2 garlic cloves, minced
                3 cups fresh broccoli, chopped
                1/2 cup celery, chopped
                1 1/2 cups carrots, sliced
                1/4 cup fresh bell peppers, chopped ( any color will work)
                4 cups vegetable juice ( V8 type)
                1 cup water
                1 teaspoon instant chicken bouillon
                1/4-1/2 teaspoon salt ( depends on taste)
                1/4 teaspoon pepper
                1/4 teaspoon thyme leaves
                1/4 teaspoon oregano
Directions
1.            Brown ground beef and garlic, crumbling very well.
2.            Drain off fat and add to crock pot.
3.            Add remaining ingredients to crock pot and give it a good stir.
4.            Cook on low 8-10 hours.
5.            Leftovers freeze well.
Nutrition Facts
Serving Size: 1 (451 g)
Servings Per Recipe: 6
Calories 275, Total Fat 11.9g, Sugars 8.1 g, Total Carbohydrate 16.9g, Dietary Fiber 5.0g, Protein 26.3g

Here we are after about 8 hours on low. It smells sooooo good in the house, by the way!

Presented in a lovely all white bowl (my treat at Ikea this fall). With a side of warm cheese tea biscuit.

Oh yeah, remember these? An absolute family favourite. Not the- made from scratch (ok- no using Bisquick- I know it's a little 'unpure) - but these are a 'once a season treat!  Here's the link to the recipe. http://simmerandglimmer.blogspot.ca/2012/04/homemade-cheddar-cheese-biscuits-and.html .

Wednesday, November 28, 2012

Renovations- Physical and Spiritual- Part 1

I wanted to share with you what has been going on my life. We have just finished about a month's worth of renovations. We partially renovated the basement, and the bathrooms/master bedroom and got 5 new windows put in. It was chaotic, messy and all at the same time.... rejuvenating. Yes, when you need to back up your basement - the one you have been throwing down stuff into for the past 10 years- you get to purge, and purge and purge. Garbage bags full came up, tons of toys donated to family and friends. It felt AWESOME. A spiritual cleans really! This is part 1.

This is before... there was a mess, and mold and ants and dust bunnies bigger than a cow.

And more mess, and carpet and cat pee stained furniture and dust bunnies older than a cow.
And the bathroom had to be gutted, and the fixtures were garbage and we later found out the shower -which we never used- Thank God- was not installed properly and would have caused major water damage. And I think there may have been a cow living in there.
Everything was torn down and ripped apart. OOOOh, the stuff they found behind walls and in ceilings was not pretty. They fixed it all up, fixed leaks, removed mold and such.

And more mess, and more demolition and more DUST. Ya, that's a big one when you do renovations.

But then, the old furniture was brought out to the curb for garbage day and the workmen cleaned up and look. Clean stairs in a cherry brown wood laminate. I love the srairs!

And look at this basement floor, FABULOUS!

Ooooh, but wait... the bathroom is one of these miracle transformations.... It's modern and clean and warm and it has those beautiful glass tiles as an accent.

I really love those beautiful glass tiles. So here is a close up....

 
Ok, so here's the biggest before and after transformation... TA DA! Look how nice and clean and uncluttered. Oh, and you ask what the heck is that wall colour? Well, Brent didn't want to go with a warm beige colour- it's his basement after all, he says the rest of the house is mine, but this is his. He chose this orange- it's called Pumpkin Pie- his favourite, what a coincidence eh!

We have spent weeks cleaning up the dust and reorganizing and purging again and again and now our home is just beautiful and I am living my dreams by creating some of the 'scenes' I have seen on Pinterest in my own home. I am living in my own beautifully organized palace and I feel like I have done some great therapy at the same time- not to mention hours of hard labour- which I could not have done 80 pounds ago. Ok, so stay tuned for some more renovation pictures. I LOVE my home! And let me know if you need an awesome contractor in the GTA!

Monday, November 26, 2012

Raspberry Berret - or - Mixed Berry French Toast

Get it??? French Toast- is French and Berrets are French. And these are delighful Mixed Berry French Toast. By the way, did you know that French Toast in French is called 'Pain DorĂ©e'. Which, translated means Golden Bread. Funny eh?

Here's how I 'Healthied' up my French Toast folks. I used fresh whole wheat bakery bread as my base.
To my liquid misture I add eggs, skim milk, vanilla and cinnamon.... always add cinnamon, it adds sweetness without any sugar or calories.

And instead of using maple syrup, I took some frozen mixed berries and melted them with a pit of maple syrup in the microwave. It adds tons of flavour and colour and antioxidents to your breakfasts. Vive les framboises!

Saturday, November 24, 2012

Nice Nails- Skin Tight Denim

oooh, sexy right???
Well, I never thought I would wear blue nail polish, but this looked sexy for sure.... and daring!

Blue with neon green racing stripes or tire tracks, whatever you want to call them...

 ... and then the pinky in a colour called "Carribean Frost", love it!

But you seriously have to love this nail colour's name. Skin Tight Denim!

Thursday, November 22, 2012

Quick Chicken Terriyaki Stirfry

Here's a quick way to feed your family. Chicken stirfry!

This is what I do.
Cut up about 3 chicken breasts into strips. Cut some colourful vegetables- this time was red and green peppers and some carrots. You could add celery, broccoli, snap peas, bean sprouts... get my drift! 

Get your hot wok pan, add some peanut oil and stir fry your chicken for about 5 minutes, then add some healthy, organic terriyaki stir fry sauce. Add your veggies and cook for about 3 minutes more.
And you are DONE!

Serve over rice or noodles (try brown of course) and add a bit of crunch with some chopped peanuts or cashews or almonds. Et, voila!

Tuesday, November 20, 2012

Amazing Adventure in Sunny Erindale Park

Yup, you're right, this picture was taken a few many weeks ago, when the trees still had those fall colours! And what's spectacular about this Amazing Adventure is that Brent was able to come with us, yeah!

It was an absolutely gorgeous sun-shinny day, we all had to wear shades!

And our blue jackets...

..this is what we like to do with the sun: have fun with shadows, oh, and that's me in the middle with the very 'defined' waist. I have a waist now!

... Brent and Melanie made a heart with shadows. I love this!!!

... but I love here more!

Gorgeous foliage!
There's my girl, she dances to her own beat, you know!
I love those 'leaves up in the air' action shots!
Fisherman in the river, they caught lots of fish... this was fun to watch, who needs TV, this is nature's entertainment.
Resting on the bench after a little walk. Love how no one's feet could touch the ground. Like we were sitting on a giant's bench.
And here is my beautiful family. Happy to be on a little hike in the park!

Sunday, November 18, 2012

Comfort food 101- Lightened up baked pasta

This is one of my favourite go to meals... especially perfect on these colder Fall days. I call it Baked Pasta!

... but this version uses lighter ingredients and more vegetables, yummo!

This recipe is off the top of my head, so here goes....

Chantal's Baked Pasta Dish

1 box of whole grain pasta (penne or macaroni)
1 jar of organic pasta sauce
1 zucchini (shredded)
1 carrot (shredded)
1 tomato (chopped)
1 onion (chopped)
1 lb of ground turkey meat
1 cup of shredded mozzarella
Olive oil and Italian herbs

Directions:
Cook the onions in olive oil in a large pan, add the ground turkey and some oregano and basil and even some garlic powder. Once it's all browned up, add the vegetables and cook for another couple of minutes. Add the jar of pasta sauce and simmer for a couple of minutes.
In the meantime, boil the water for the pasta and cook it al dente.
In a 9x13 oven-proof dish, place the noodles and the meat sauce all in one and mix it around. Spread the shredded cheese on top and bake in a 350 degrees oven until the cheese bubbles- about 20 minutes.
Enjoy with a green salad for a nicely balanced meal.


Friday, November 16, 2012

Mini Pumpkin Pies

... and the other, my dear husband's favourite, and it turns out that it was Melanie's too!  The mini pumkin pie recipe.


Mini Pumpkin Pies
http://kidscooking.about.com/od/thanksgivingdesserts/r/pumpkin-tarts-mini-pumpkin-pies.htm
Ingredients:
•1 package containing two refrigerated pie crusts
•1 15 oz. can unsweetened pumpkin puree (not pumpkin pie mix)
•2 large eggs
•1/2 cup firmly-packed light brown sugar
•1 12 oz. can evaporated milk ( I used lower fat version)
•1-1/2 tsp. pumpkin pie spice
Preparation:
1.Preheat oven to 375 degrees F.
2.Unroll each pie crust. Using a 3-1/2 inch round biscuit or cookie cutter, cut circles in the pie dough, starting from the outside and working your way around, so you can get as many circles as possible without having re-roll. You should be able to get 10-12 circles out of each pie crust. Press circles into the cups of a standard muffin tin. The crust will not come all the way up the muffin cups -- don't worry. It should come up about halfway.
3.Mix together remaining ingredients. Using a 1/4-cup measuring cup, fill the pie crusts with the pumpkin mixture, being careful to fill only to the top of the crust not all the way to the top of the muffin cups.
4.Bake 18-24 minutes until crusts are lightly browned and pumpkin pie filling is nearly set.
Makes 20-24 mini pumpkin pies or tarts.
You can make these pumpkin tarts up to two days in advance. Refrigerate until ready to serve. Garnish with whipped cream, if desired.

Wednesday, November 14, 2012

Mini Apple Pies

As promised, here is the recipe I made for Thanksgiving. Mini Apple pies. For me, it's all about portion control, so when you can make them in little muffin tins- you have your perfect little desert.


Apple Pie in a Muffin tin
Apple pie filling
5 granny smith apples peeled and sliced thin
1/3 cup brown sugar
1/3  cup cooking stevia, splenda or white sugar
3 tbsp white flour
1 tsp cinnamon
1/4 tsp ground ginger
1/4 tsp cloves
1/4 tsp nutmeg
1/2 tsp salt
1 tbsp lemon juice
Topping
1/3 cup large oats
3 tbsp whole wheat flour
1/2 tsp cinnamon
pinch of salt
3 tbsp cold butter
3 tbsp brown sugar
2 sheets of puff pastry

Mix the apple pie filling. Mix the topping using your fingers to rub in the butter until you get a crumble.
Roll out the dough- recommend rolling the dough out thinner than I did so that it doesn’t harden too much on the 2nd day.
Cut circles in the pastry large enough to fit into large muffin tins.    You could also roll out enough pastry to form a circle for a large pie.
Poke some holes in your crust with a fork to prevent the dough from shrinking.  Fill to the top with prepared apple mixture.  Top with about 3 tbsp of crumble and bake at 350 degrees until apples are soft and topping is lightly brown.  I cooked for about 40 min.
While still warm, run a knife around the tarts to release then from the pan.  Place on a wire cooling rack.
Calories 262, carbs 38g, fat, 11g, protein 4g, fibre 4g, 19g sugar

Tuesday, November 13, 2012

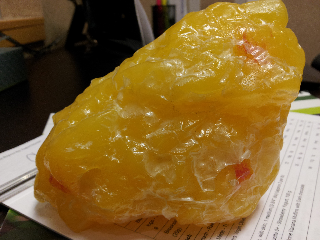
I have lost 80.6 of these things!

That's right friends! Time to share with you that I have lost 6.8 lbs since last check for a grang total of 80.6 lbs.  And some of you might wounder, what the heck is that????

Well, it's a representation of 1 pound of fat. It's a soft, lumpy, yellowy mass.

Here it is in my hand, pretty big, eh? And pretty big deal!!!! I used to carry around 80.6 of these on my body. Needless to say, I am feeling much lighter lately and can walk faster, clean harder, stand longer and kick some ass! Goodbye yellow lumpy fat, hello new workout wear!

Monday, November 12, 2012

Amazing Adventure- Celebrating Fall in Oakville

We took some time a few weeks ago to go out and enjoy the leaves. Enjoy the leaves? How do you do that, you might ask?
Well, in Oakville, you need to enjoy the OAK leaves... get it????
Some leaves are still on the trees in front of these beautiful historical homes.
Some leaves are at the foot of the pillar in front of the Oakville Museum, next to the pretty mums.
No leaves here, but look at this old building! Banks sure looked different back in 1856.
Look a these gorgeous fire red leaves on the tree next to my parents home.
Here we see them on a tree next to the lake.
... and here we see them on the ground, still beautifully colourful!
Just grandiose, don't you think? Look at that blanket of leaves...
Melanie couldn't resist playing in the leaves.... Action shot!
Turning to the west, we are at the Navy Street Pier and lighthouse.
Looking off into the 'clouds'.
This is my beautiful daughter. I love this picture, it's actually my current desktop photo.
It was cold and windy, but the seagulls didn't mind.
Melanie pointing to the obvious...
I, on the other hand, am posing 'between' the obvious signage.
Safety first...
...but I don't care, I am the King of the World!
... and Mella, well she just hops around the rocks... kids, don't try this at home!
Some of the flowers and strange prickly things were still out in full force.

Some of them turned bright red and hot like fire.... can you believe the colour???
Melanie among the rock formations and flowers. Let's return for your wedding photos, ok, Mella?
... and this, I have never seen. Black leaves with black and dark red berries... wow, nature is fantastic.

Even more bright reds... and white- in honour of Canada I am sure!
Another, pretty historic home. This one was the captain's home, built in 1833. So our adventure was filled with beauty and a side of history. Thank you Oakville!
Related Posts Plugin for WordPress, Blogger...